


前言
侧边栏的网站统计小工具的搭建方法其实也很简单
实际效果预览:

安装教程:
- 1、首先第一步在你的主题目录下面下载我准备好的 widget-websitestat.php 文件,文件我放在文章结尾
- 2、在主题目录下
themes/zibll/functions.php文件中,添加下面的函数代码即可。随便你添加在多少行 - 3、在
网站后台---》zibill 主题设置---》自定义代码---》自定义 CSS 样式,添加下面的 CSS 代码, - 主题没有自定义 CSS 样式的,在主题目录下 style.css 添加也都可以。
/*网站<a target=\"_blank\" href=\"https://yooy.vip/tag/%e4%bf%a1%e6%81%af\" title=\"View all posts in 信息\">信息</a><a target=\"_blank\" href=\"https://yooy.vip/tag/%e7%bb%9f%e8%ae%a1\" title=\"View all posts in 统计\">统计</a>小模块 by 悠悠 yooy.vip*/
.widget_Websitestat h3{font-weight:700;}.widgest-boys{overflow:hidden;}.widgest-boys .widgest-bg{margin: 4px; background-size: cover; background-repeat: no-repeat; background-position: center center; cursor: pointer; border-radius: 8px;}.widgest-boys .widgest-main{align-items: center; place-content: flex-start space-around; display: flex;}.widgest-boys .widgest-meat{display: block; margin-block-start: 1em; margin-block-end: 1em; margin-inline-start: 0px; margin-inline-end: 0px; color: rgb(255, 255, 255); font-weight: 700 !important; line-height: 1.5 !important;}.widgest-bg:not(article){transition: all 0.3s;}.widgest-bg:not(article):hover{transform: translateX(-10px);}
/*图片路径设置*/
.widgest-bg1{background-image: linear-gradient(rgba(0, 0, 0, 0.2), rgba(0, 0, 0, 0.2)),url(http://124.223.87.188/PNG/1.jpg);}
.widgest-bg2{background-image: linear-gradient(rgba(0, 0, 0, 0.2), rgba(0, 0, 0, 0.2)),url(http://124.223.87.188/PNG/2.jpg);}
.widgest-bg3{background-image: linear-gradient(rgba(0, 0, 0, 0.2), rgba(0, 0, 0, 0.2)),url(http://124.223.87.188/PNG/3.jpg);}
.widgest-bg4{background-image: linear-gradient(rgba(0, 0, 0, 0.2), rgba(0, 0, 0, 0.2)),url(http://124.223.87.188/PNG/4.jpg);}
.widgest-bg5{background-image: linear-gradient(rgba(0, 0, 0, 0.2), rgba(0, 0, 0, 0.2)),url(http://124.223.87.188/PNG/5.jpg);}
.widgest-bg6{background-image: linear-gradient(rgba(0, 0, 0, 0.2), rgba(0, 0, 0, 0.2)),url(http://124.223.87.188/PNG/6.jpg);}
.widgest-bg7{background-image: linear-gradient(rgba(0, 0, 0, 0.2), rgba(0, 0, 0, 0.2)),url(http://124.223.87.188/PNG/7.jpg);}
.widgest-bg8{background-image: linear-gradient(rgba(0, 0, 0, 0.2), rgba(0, 0, 0, 0.2)),url(http://124.223.87.188/PNG/8.jpg);}
.widgest-bg9{background-image: linear-gradient(rgba(0, 0, 0, 0.2), rgba(0, 0, 0, 0.2)),url(http://124.223.87.188/PNG/9.jpg);}
.widgest-bg10{background-image: linear-gradient(rgba(0, 0, 0, 0.2), rgba(0, 0, 0, 0.2)),url(http://124.223.87.188/PNG/10.jpg);}
.widgest-bg11{background-image: linear-gradient(rgba(0, 0, 0, 0.2), rgba(0, 0, 0, 0.2)),url(http://124.223.87.188/PNG/11.jpg);}
/*网站信息统计小模块 by 悠悠 yooy.vip*/- 4、另外上一步 CSS 代码中是有的 11 张图片是需要单独设置的,当然嫌麻烦的也可以引用我的,我把图片上传永久地址了
- 说明:不想用我的图片你自己用一张图片剪切成 11 份,然后按顺序添加进去,css 中”widgest-bg1-widgest-bg11″都是按顺序好的,在 url(图片链接路径)里面加就行
- 我是用下面的在线剪切工具,也挺方便可以实时看到剪切效果
- 在线地址:https://www.qtool.net/piccutting
5、在主题目录下/wp-content/themes/zibll/functions.php文件中放入下面的引用代码放在functions.php文件底部就可以
//添加站点统计小工具-yooy.vip
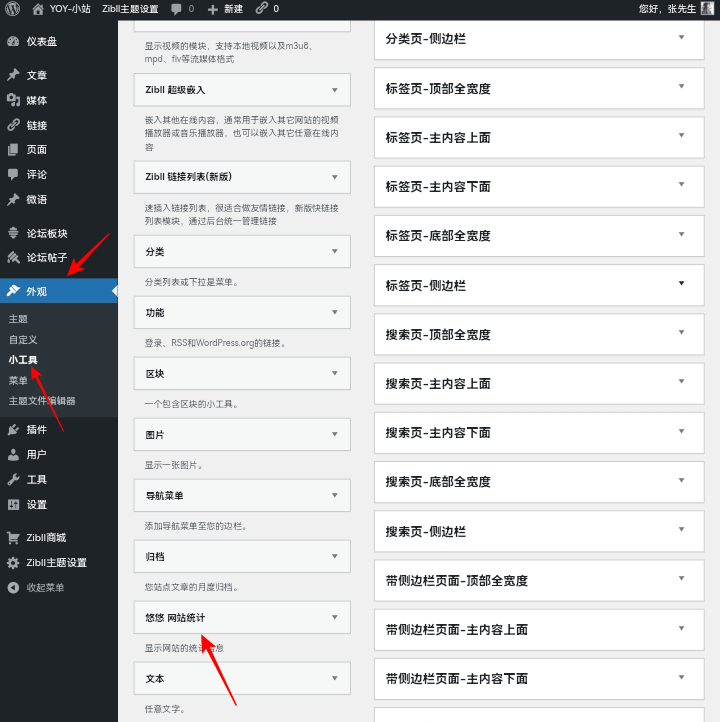
include(\"widget-websitestat.php\");6、最后一步,在网站后台—》外观—》小工具—》悠悠网站统计,添加首页到侧边栏即可完成。
widget-websitestat.php文件下载:
本文隐藏内容 – 登录可见
下载:
https://wwp.lanzout.com/iuchp04wempi
密码:a58m
© 版权声明
THE END


![【汉化破解】Yoast SEO Premium-WordPressSEO最强插件[更至v19.6]-干货网](https://www.120.team/wp-content/uploads/2022/12/d2b5ca33bd205227-300x200.png)


![表情[fendou]-干货网](https://www.120.team/wp-content/themes/zibll/img/smilies/fendou.gif) 学习了
学习了


暂无评论内容